Precision Shaft Measurement

From the Pioneers of Shaft Metrology

Adcole is the only company solely dedicated to enhancing the quality of cylindrical and eccentric rotating shafts used in your assemblies. Even micron-level surface deviations can significantly impact the performance and longevity of these components. Issues such as high-friction contact points and imbalances can lead to vibrations that compromise the integrity of the final assembly. Poor shaft quality can be costly—both in terms of performance and production. That’s why engineers and production managers must implement robust quality control systems and ensure they are equipped with the right tools to measure and monitor critical features with precision.

In 1957, Addison D. Cole proceeded with the founding of Adcole Corporation, now Adcole LLC, a business set to become a revolutionary industrial technology manufacturer within the automotive and space exploration industry.

Following a chance meeting in the 1960’s with a powertrain engineer from International Harvester Company, now International Motors LLC, Mr. Cole envisioned how Adcole’s calibration techniques for their fine-angle sun sensors could be applied to precision metrology systems for camshaft production. With this “eureka” moment, Adcole became the first company in the world to manufacture automated shaft metrology systems whose accuracy, precision, and durability have set a standard of excellence that has yet to be eclipsed to this day.

With Adcole’s major product lines established, it became clear to the broader industrial technology community that under the leadership of Mr. Cole, this was to be a business dedicated to solving complex problems in both space and here on earth, pushing the boundaries of precision, accuracy, and quality, and forever to be recognized as the leader in TRUSTED ACCURACY systems.

Why Adcole

Wherever precision matters, Adcole delivers unmatched accuracy and reliability.

With over 60 years of expertise, Adcole has set the industry standard for shaft gaging—becoming the benchmark against which all others are measured. Dimensional accuracy is critical in many shaft features, and Adcole gages are ideally suited for these high-precision applications. Typical examples include lifter lobes and bearing journals on camshaftsthrust faces and pin journals on crankshafts, and shaft diameters and gear teeth on EV rotor shafts.
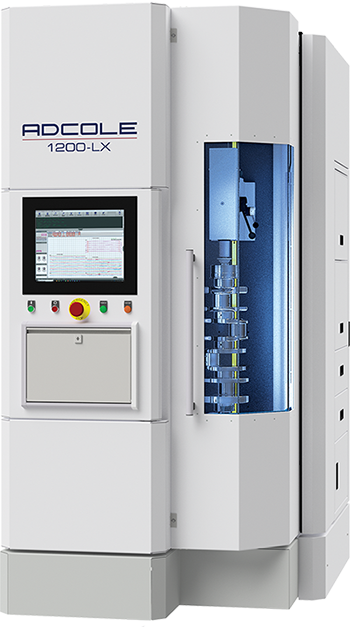
Adcole 1200-LX Shaft Metrology Gage

Parameters Measured

Angularity

Angularity controls the orientation of a feature at a specified angle (other than 90°) relative to a datum.

When the diameter of a cylindrical feature is larger in the middle than at the ends and is based on the difference between the measured diameter of the center cut and the average of the diameters of the two outer cuts.
Chatter refers to unwanted surface irregularities caused by vibrations during machining, which can affect form and profile tolerances. While not a defined GD&T term, chatter can lead to parts failing inspection due to deviations from specified geometric or surface finish requirements.
Concentricity is a tolerance that controls how closely the axes of two or more cylindrical or spherical features align with a common datum axis.
A form tolerance that controls how close a feature is to a perfect cylinder. It ensures that the surface of a cylindrical part is uniform and smooth along its entire length and circumference and is defined by the difference between the maximum radius and the minimum radius of all three measurements relative to the axis of the outer cuts.

Used to indicate that a tolerance or dimension applies to a cylindrical feature, such as a hole or a shaft. Diameter is based on a single radial measurement. The follower readings are summed up and divided by the number of data points per revolution, and then multiplied by two to get the average diameter.

Flatness is a form tolerance that ensures that all points on a surface lie within two parallel planes that are a specified distance apart
The parallelism tolerance applied to a linear feature, such as a surface or an axis, to ensure it remains consistently parallel to a specified datum and is measured by the two linear scans taken 180 degrees apart from each other.
Refers to a uniform change in diameter along the length of a cylindrical or conical feature. Linear Taper is measured by the two linear scans taken 180 degrees apart from each other.
A form error where a circular feature (like a hole or shaft) deviates from a perfect circle and forms lobes—small, wave-like distortions around its circumference. It is measured by the difference between a maximum radius and the minimum radius relative to the least squares center of a single radial measurement over a defined angular region.
A type of orientation control that ensures a feature (like a surface or axis) is parallel to a datum within a specified tolerance with the measurement based on the radial measurements of the two outside cuts of the journal.
Perpendicularity is a orientation tolerance that ensures that a surface, axis, or center plane is exactly 90° to a specified datum feature.
Material build-up refers to excess or residual material on a surface—such as burrs or debris—that can interfere with accurate measurement and inspection. While not a formal GD&T term, it can affect tolerances like flatness, profile, and perpendicularity by creating false readings or surface irregularities.
The difference between the maximum radius and the minimum radius relative to the least squares center of a single radial measurement.
A tolerance that controls how much a surface or feature can vary when the part is rotated around a datum axis. It’s used to ensure that rotating parts like shafts, gears, or wheels spin smoothly without wobbling or vibration. Total Runout would control the overall straightness and smoothness of the shaft as it rotates. Runout is based on a single radial measurement and is defined as the difference between the maximum radius and the minimum radius relative to the reference axis.
Slope is described as the rate of change in height or angle of a surface, and it can be controlled using angularity, profile, or basic dimensions combined with datums.
Straightness referes to the difference between the maximum positive deviation and the maximum negative deviation relative to the Least Squares line of a single vertical measurement.
A gradual change in diameter along the length of a cylindrical or conical feature, taper measurement, particularly on journals, is based on the radial measurements of the two outside cuts of the journal.

This parameter is calculated using the information from the computed centers of the two outer cuts. The distance between these centers and the specified part axis determines the throw.

Controls the exact location of a feature—like a hole, slot, or pin—relative to a datum reference frame. The true position parameter is calculated using the information from the throw and index calculations for the rod journals.
Typically refers to the distance between two parallel surfaces or features, such as the thickness of a slot or the diameter of a hole and can be further refined with tolerances like profile, parallelism, or position to ensure precise control over the feature’s size and orientation.
In GD&T, this kind of positional control is typically handled using the position tolerance (⌀) applied to a feature relative to a datum reference frame, which may include the Z-axis as one of the datums.

Software

Measuring quality is essential for ensuring that products meet specified standards and perform reliably.

These tools often include features for tracking defects, analyzing performance metrics, and generating detailed reports. By providing insights into areas for improvement, Adcole gage software helps your organization maintain the highest standards and continuously enhance your products.

Technical Articles

Have Any Questions?

Contact Our Experts

Quick Contact